Kintsugi Repair Kit Manual - Step-by-Step DIY Guide

Thank you for choosing the Kivanu Kintsugi Repair Kit! You’re not just repairing a broken object; you’re embracing a Japanese tradition from the 15th century that transforms cracks into art. Kintsugi, or “golden joinery,” celebrates imperfections, turning the damaged into something more beautiful and valuable. With this kit, you won’t just restore ceramics, you’ll create a unique piece that tells your story: a symbol of resilience, creativity, and beauty in the imperfect.

What makes Kintsugi special?

More than a technique, it’s a philosophy. Inspired by Japanese wabi-sabi, Kintsugi (金継ぎ) teaches us to see beauty in scars. By joining fragments with gold, silver, or green, we don’t hide the breaks, we exalt them. Whether it’s a cherished mug with sentimental value or a new piece you want to personalize, this kit gives you the tools to turn the ordinary into the extraordinary.

Our Promise

At Kivanu, we’ve designed this kit to be safe, easy to use, and deeply rewarding. Unlike other products, we combine high-quality materials with an emotional approach that resonates with you. This isn’t just a repair kit; it’s a creative experience that will make your piece stand out from the rest.

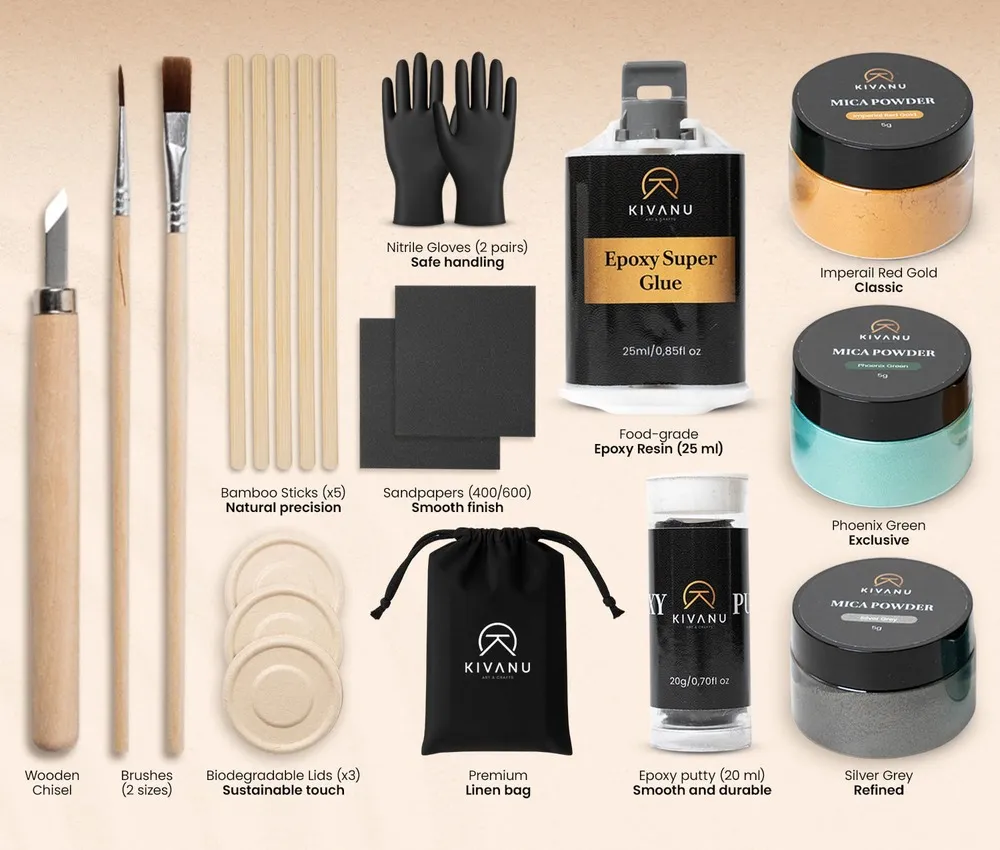
What's Inside Your Kit?

  • Epoxy Resin Glue (25 ml): Compliant with FDA 21 CFR §175.105, with a precision applicator.
  • Epoxy Putty (20 g): Moldable and durable for filling gaps.
  • Mica Powders (3 colors): Brilliant Gold, Elegant Silver, and the exclusive Phoenix Green.
  • Bamboo Sticks (x5): For precise mixing.
  • Biodegradable Mixing Lids (x3): For mess-free blending.
  • Sandpaper (2 sheets): 400/600 grit for perfect finishes.
  • Brushes (x2): One fine for details, one wide for coverage.
  • Wooden Chisel: For precise sculpting.
  • Nitrile Gloves (2 pairs): For your safety.
  • Linen Bag & Gift Box: Elegant and eco-friendly.
Complete Kintsugi Repair Kit

Important: Safety & Care

Take care of yourself and your art.

⚠️ Safety First:
  • Always wear the included nitrile gloves and work in a well-ventilated area.
  • Epoxy may cause skin sensitization. Avoid prolonged skin contact.
🚫 Usage Limitations (Food Safety):
  • Epoxy Glue: Compliant with FDA 21 CFR §175.105 (indirect food contact; cold/dry foods only).
  • Epoxy Putty: NOT for food contact.
  • Recommendation: Repaired pieces are decorative or may be used for dry, room-temperature foods only when the contact surface is epoxy glue (no putty).
🔥 Heat Limits:
  • NOT microwave-safe or oven-safe.
  • Do not use with hot liquids.
  • Gently hand wash only (dishwasher use not recommended).

Preparation: Set Up Your Workshop

  1. A good beginning is half the success. Prepare your sacred space.
  2. Choose the Perfect Spot: A well-lit table (natural light highlights details) in a ventilated area.
  3. Protect Your Surface: Cover your workspace with paper or an old tablecloth.
  4. Clean Thoroughly: Use a damp cloth to remove dust or grease from the broken edges. Let them dry completely.
  5. Prepare the Edges: Lightly sand the broken edges with the sandpaper (400/600 grit) to create a rough texture that improves epoxy adhesion.

The Kintsugi Process

This is the heart of the ritual. Follow these steps carefully to breathe new life into your piece. Take your time, breathe, and enjoy the creative process.

Step 1 - Mix the Epoxy & Mica

The heart of Kintsugi. Be precise.

  • Exact Proportion: Dispense equal parts (1:1) of resin and hardener into a biodegradable mixing lid.
  • Mix Thoroughly: Stir with a bamboo stick for 1-2 minutes until you achieve a uniform, streak-free consistency.
  • Add Magic: Sprinkle a pinch of mica powder (gold, silver, or green) and mix gently for a dazzling metallic finish.
  • Essential Trick: Prepare only what you'll use in 10 minutes. Epoxy hardens quickly. Mix in small batches for better control.

Step 2: Join the Pieces with Care

Joining the stories.

  1. Apply the Epoxy: Use a bamboo stick to apply a thin, even layer to one of the broken edges.
  2. Join the Fragments: Press the pieces firmly together for 1-2 minutes, ensuring they're aligned.
  3. Clean Excess: Wipe away excess epoxy before it dries to keep lines crisp.
  4. Initial Drying: Let the piece rest for 24 hours without moving it.

Step 3: Embellish (The Kintsugi Touch)

This is the alternative (and most popular) method for a perfect metallic finish.

  1. Key Moment: Join the pieces using epoxy without color. Wait 5-10 minutes after joining: the epoxy will be "tacky," perfect for mica.
  2. Apply Mica: Use the fine brush to sprinkle powder over the seams.
  3. Press Gently: Gently press with a gloved finger for a glossy, deep finish.

Step 4: Fill Gaps with Putty (Optional)

For when a fragment is missing.

  1. Prepare the Putty: Take a small portion and knead it with your fingers until it's smooth and uniform.
  2. Fill with Precision: Press the putty into cracks or large gaps.
  3. Sculpt: Use the wooden chisel to sculpt and smooth the putty.
  4. Cure & Paint: Let it harden for 60 minutes, then apply a fresh layer of epoxy with mica over the putty to color it.

Step 5: Final Curing and Finishing

Patience for perfection.

  1. Initial Drying: Keep the piece still for 24 hours for initial drying.
  2. Full Strength: Wait 72 hours (3 days) for the epoxy to reach maximum hardness and strength.
  3. Final Cleaning: After 72 hours, use a dry brush to remove excess mica and reveal a flawless, brilliant finish.

Help and Inspiration

Have a question? It's all part of the journey. Here you'll find answers to common questions, tips from our artisans, and how to share your finished masterpiece with our community.

FAQs & Troubleshooting

While the epoxy adhesive is compliant for indirect food contact, we recommend using it for decoration or for dry, room-temperature foods only when the contact surface is epoxy glue (no putty). Avoid liquids or heat.

No. Repaired pieces cannot withstand high temperatures or microwaves.

If the epoxy is still fresh, wipe it off with a damp cloth or adjust with the chisel. Once cured, sand gently to correct.

Yes, but avoid submerging the piece in liquids for extended periods.

Repaired pieces are decorative, or may be used for dry, room-temperature foods only when the surface in contact is epoxy glue (no putty). Do not use with liquids or heat.

Up to 12 months when stored properly (cool, dry, sealed containers).

Share Your Masterpiece

Kintsugi reminds us that scars are beautiful. With this kit, you've given new life to something broken, creating a masterpiece that reflects your creativity and spirit. We want to celebrate with you!

Share photos of your piece on social media with #kivanukintsugi and tag us @kivanu.studio.

Visit www.kivanu.com for more inspiration and to join our community of artists.